Remote Weather Station using DHT11 Humidity Sensor, Arduino and GSM Modem
DHT11 is a basic, low-cost digital temperature and humidity sensor. It provides real time readings of the humidity basis on the current temperature of the surroundings and will tried to plot a real time digital graph according to the readings stored in the data storage.

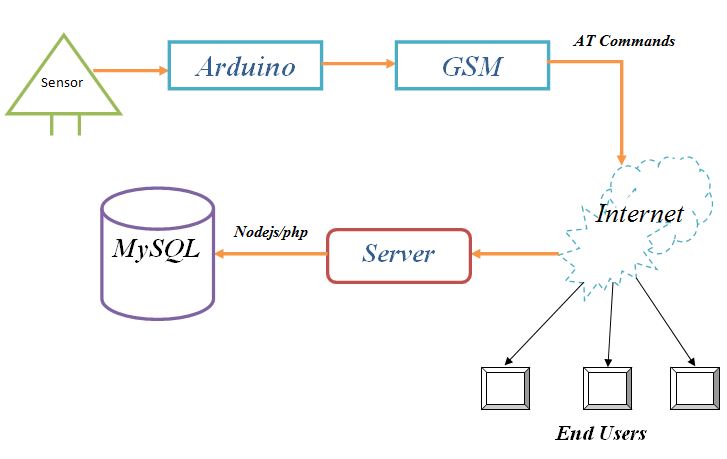
In this module we developed a portable weather station using DHT11 humidity sensor and arduino which reads the current temperature of the air and transmit the data through the GET method using HTTP AT commands and stores the values into the database in every 30 seconds.
Note: For DHT11 humidity sensor you will need to download DHT11 library and Adafruit library.

- Apart from this we also carried out the same work by displaying the humidity of the temperature on the LCD screen display.
- To Understand HTTP AT Commands refer to below link:
http://simcom.ee/documents/SIM900/SIM900_HTTPS%20AT%20Command%20Set_V1%2000.pdf
Here is the Arduino code:
#include <TextFinder.h>
#include <Adafruit_Sensor.h>
#include <SoftwareSerial.h>
#include <LiquidCrystal.h>
#include "DHT.h"
#define DHTPIN 8
#define DHTTYPE DHT11
SoftwareSerial SIM900(9,10);
TextFinder finder(SIM900);
DHT dht(DHTPIN, DHTTYPE);

LiquidCrystal lcd(12, 11, 5, 4, 3, 2);
int backLight = 13;
const int NUMBER_OF_FIELDS = 3; // how many comma separated fields we expect
int fieldIndex = 0;            // the current field being received
int values[NUMBER_OF_FIELDS];   // array holding values for all the fields
int temp, var1,var2;
double t;
double f;
double h;
String a;

void setup()
{
  Serial.begin(9600);
  SIM900.begin(9600);
  pinMode(backLight, OUTPUT);
  digitalWrite(backLight, LOW);
  lcd.begin(16, 2);
  dht.begin();
  delay(1000);
  Serial.println("DHT11 Data Display and Transmit");
  lcd.setCursor(0,0);
  lcd.print("Portable Weather");
  lcd.setCursor(0,1);
  lcd.print("Station         ");
  delay(10000);
  SIM900.println("AT");
  delay(1000);
  lcd.setCursor(0,0);
  lcd.print("Initialization..");
  lcd.setCursor(0,1);
  lcd.print("                ");
  printSIM900Data();
  SIM900.println("AT+CGATT=1");
  delay(1000);
  lcd.setCursor(0,0);
  lcd.print("Configuring.....");
  lcd.setCursor(0,1);
  lcd.print("                ");
  printSIM900Data();
  SIM900.println("AT+SAPBR=3,1,\"CONTYPE\",\"GPRS\"");
  delay(1000);
  lcd.setCursor(0,0);
  lcd.print("Configuring.....");
  lcd.setCursor(0,1);
  lcd.print("                ");
  printSIM900Data();
  SIM900.println("AT+SAPBR=3,1,\"APN\",\"TATA.DOCOMO.INTERNET\"");
  delay(2000);
  printSIM900Data();
  SIM900.println("AT+SAPBR=3,1,\"USER\",\"\"");
  delay(2000);
  printSIM900Data();
  lcd.setCursor(0,0);
  lcd.print("Wireless  Setup ");
  lcd.setCursor(0,1);
  lcd.print("                ");
  SIM900.println("AT+SAPBR=3,1,\"PWD\",\"\"");
  delay(2000);
  lcd.setCursor(0,0);
  lcd.print("Wireless  Setup ");
  lcd.setCursor(0,1);
  lcd.print("                ");
  printSIM900Data();
  SIM900.println("AT+SAPBR=1,1");
  delay(2000);
  lcd.setCursor(0,0);
  lcd.print("Wireless  Setup ");
  lcd.setCursor(0,1);
  lcd.print("                ");
  printSIM900Data();
  SIM900.println("AT+HTTPINIT");
  delay(2000);
  lcd.setCursor(0,0);
  lcd.print("HTTP Initializa-");
  lcd.setCursor(0,1);
  lcd.print("tion            ");
  printSIM900Data();
  SIM900.println("AT+HTTPPARA=\"CID\",1"); //init the HTTP request
  delay(2000);
  lcd.setCursor(0,0);
  lcd.print("HTTP Request....");
  lcd.setCursor(0,1);
  lcd.print("                ");
  printSIM900Data();
  delay(1000);
  lcd.setCursor(0,0);
  lcd.print("Weather Reports.");
  lcd.setCursor(0,1);
  lcd.print("                ");
}
void loop()
{
  tempdata();
  delay(3000);
  SIM900.print("AT+HTTPPARA=\"URL\",\"http://150.129.3.70/gsm/index.php?");
  SIM900.print("temp_c=");
  SIM900.print(t);
  SIM900.print("&temp_f=");
  SIM900.print(f);
  SIM900.print("&humidity=");
  SIM900.print(h);
  SIM900.println("\"");
  printSIM900Data();
  delay(1000);
  SIM900.println("AT+HTTPACTION=0");
  for(fieldIndex = 0; fieldIndex  < 3; fieldIndex ++)
  {
    values[fieldIndex] = finder.getValue(); // get a numeric value
    Serial.print(values[fieldIndex]);
    Serial.print(".");
    var1=values[1];
    var2=values[2];
     if(var2==200)
     {
       delay(1000);
       lcd.setCursor(0,0);
       lcd.print("TMP:     C     F");
       lcd.setCursor(0,1);
       lcd.print("Humidity:     %");
       lcd.setCursor(4,0);
       lcd.print(t);
       lcd.setCursor(10,0);
       lcd.print(f);
       lcd.setCursor(9,1);
       lcd.print(h);
       delay(1000);
       var2=0;
     }
     else if(var2==150 || var2==129 || var2==70 || var2==0 || var2==2)
     {
       delay(1000);
       lcd.setCursor(0,0);
       lcd.print("Loading.........");
       lcd.setCursor(0,1);
       lcd.print("In Process.....");
     }
     else if(var1==3 || var1==5 || var1==10)
    {
      delay(1000);
      lcd.setCursor(0,0);
      lcd.print("TMP:     C     F");
      lcd.setCursor(0,1);
      lcd.print("Humidity:     %");
      lcd.setCursor(4,0);
      lcd.print("ERROR  ");
      lcd.setCursor(10,0);
      lcd.print("ERROR ");
      lcd.setCursor(9,1);
      lcd.print("ERROR  ");
      delay(1000);
    }
    else{}
  }
  fieldIndex = 0;  // ready to start over
  delay(10000);
}
void printSIM900Data()
{
  if(SIM900.available())
    Serial.println(SIM900.readString());
}
void tempdata()
{
  h = dht.readHumidity();
  t = dht.readTemperature();
  f = dht.readTemperature(true);

  if (isnan(h) || isnan(t) || isnan(f))
  {
    Serial.println("Failed to read from DHT sensor!");
  }
}
-
Here are some screenshots that shows how data are transmitted using arduino:
HTTP AT commands HTTP AT commands Reading temperature using DHT11 humidity sensor -
Apart from this we also use LCD screen display to show the current temperature of the environment.
-
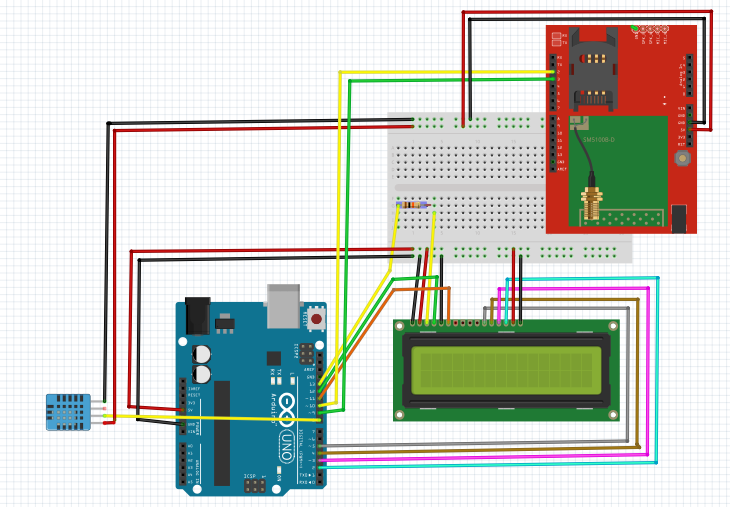
Here is the circuit diagram that how LCD display is connected with arduino.
Circuit Diagram of Portable Weather station -
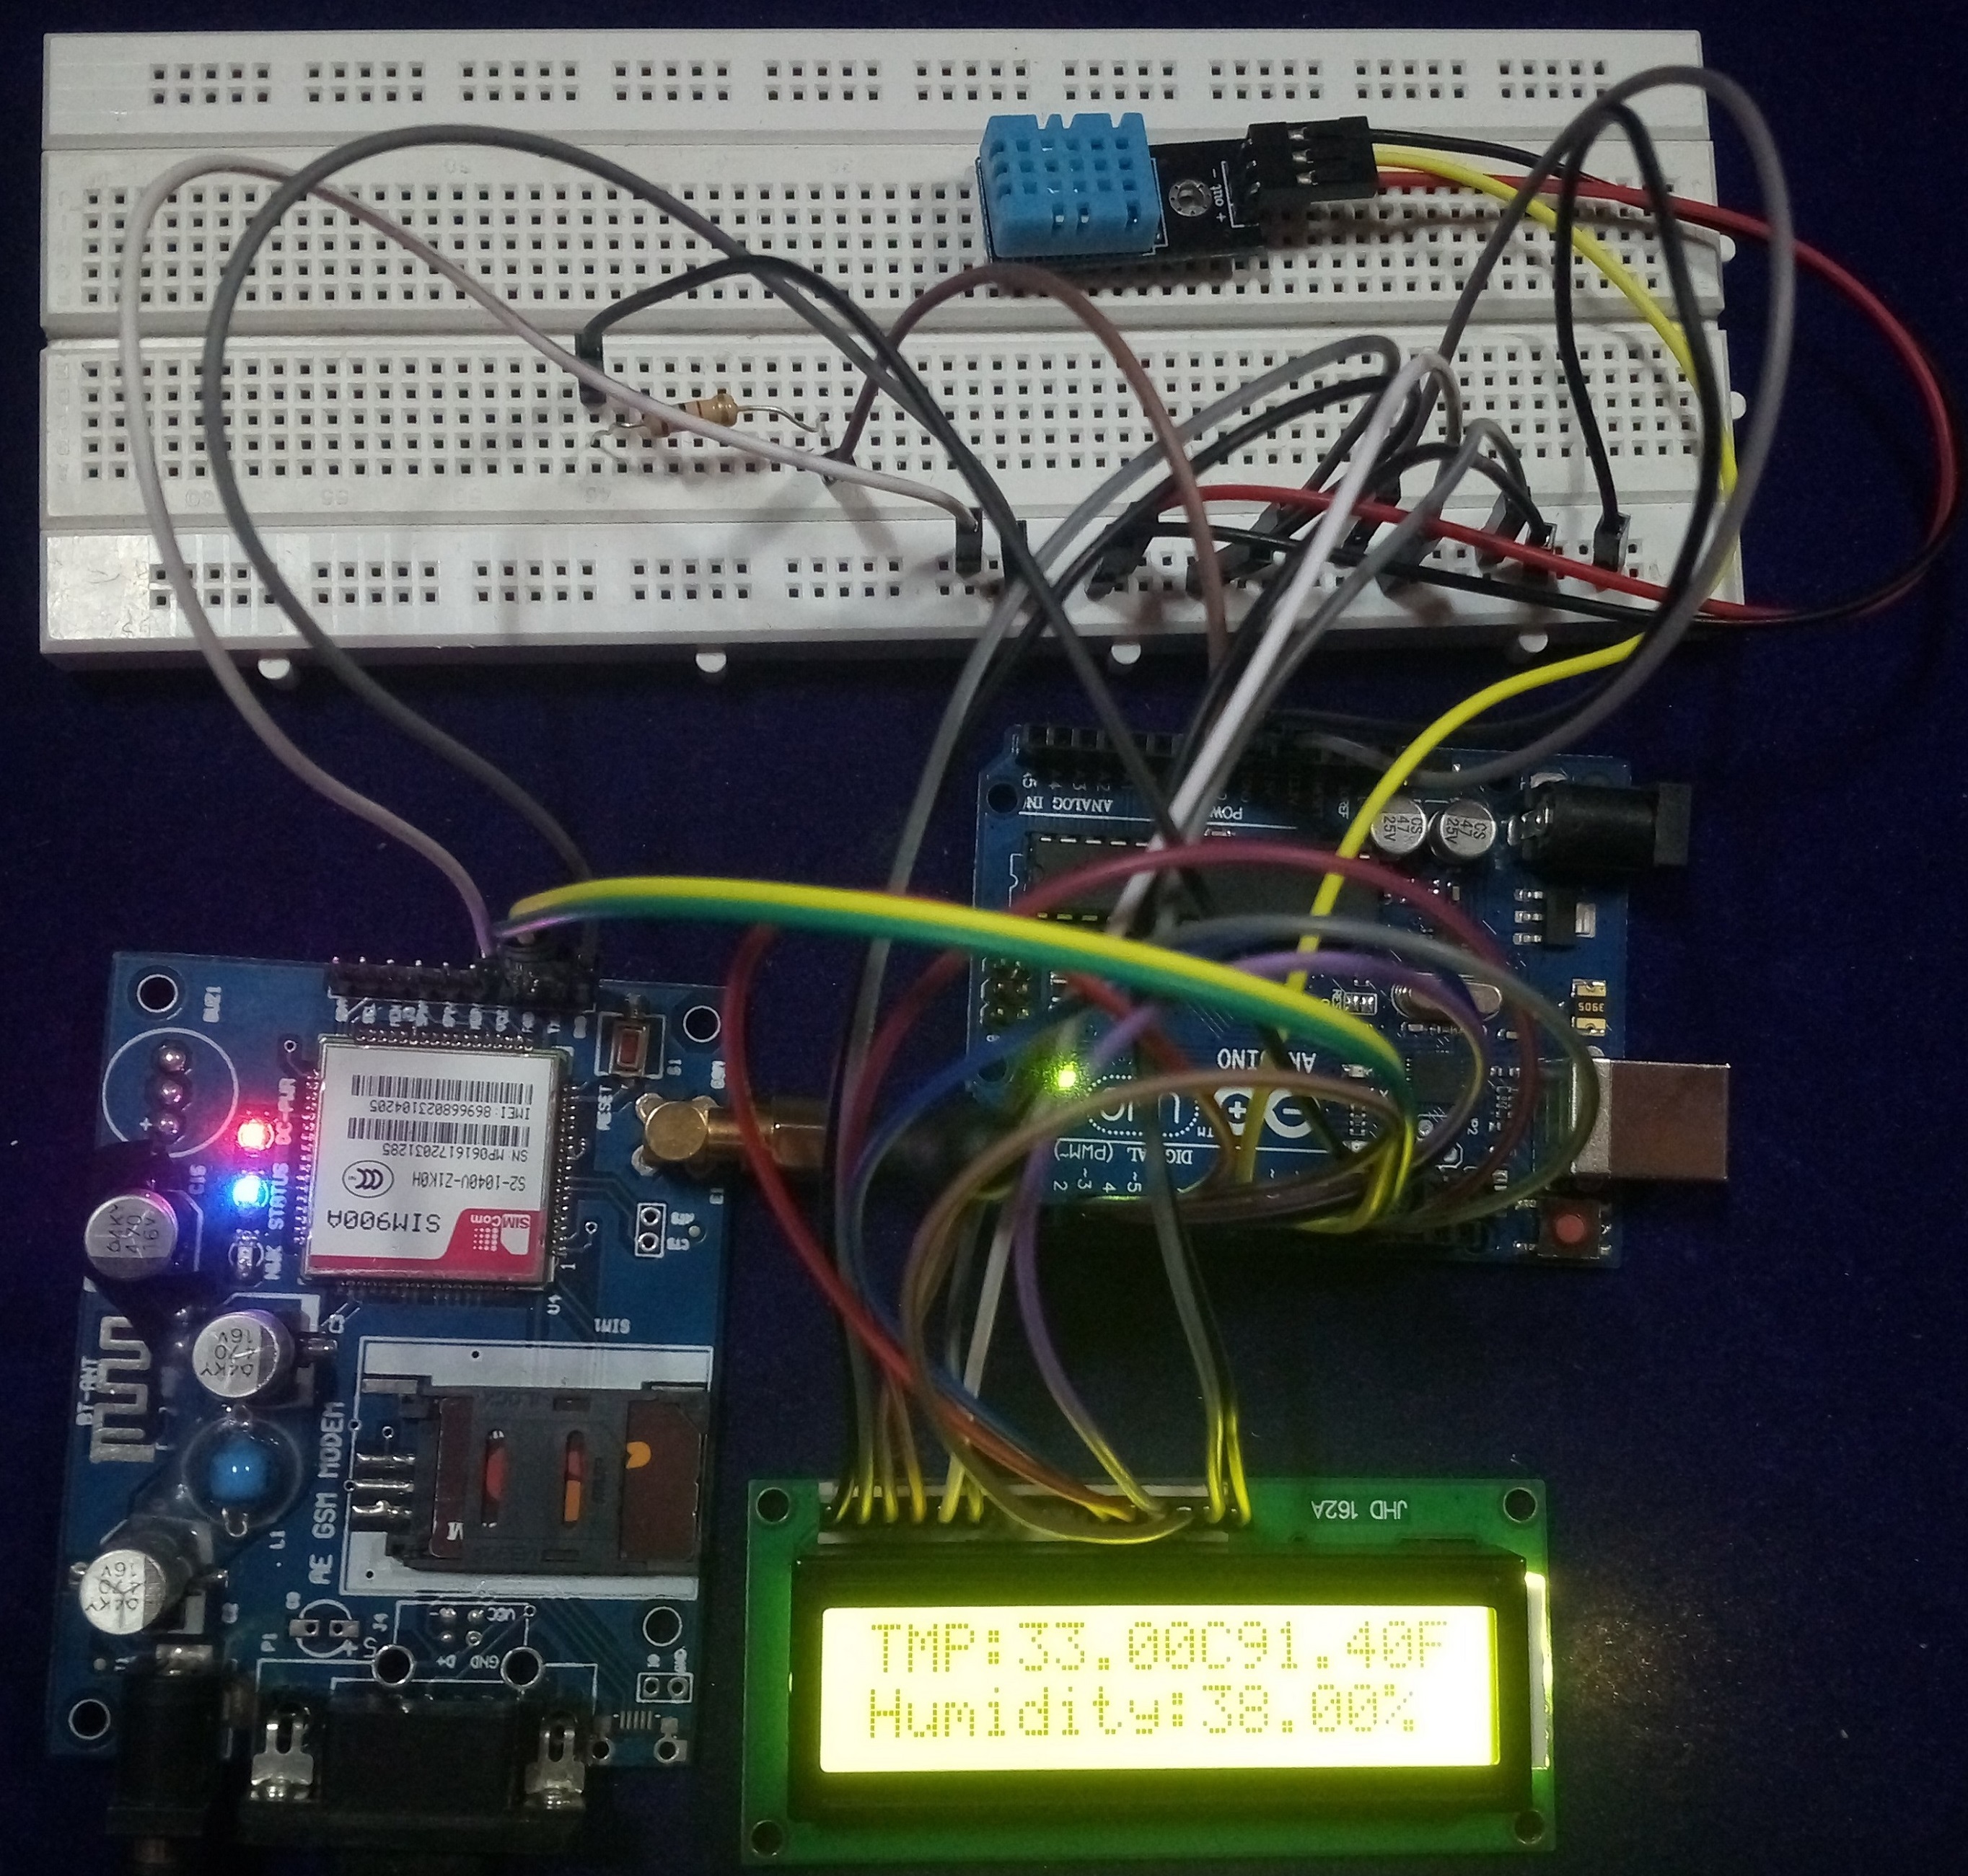
Here is the Picture of real time implementation of detecting current temperature of the environment.
-
Storing current detected values into the MySQL database.
Database Storage -
You can also see the live demo of this module:
-
-
These professional weather station are equipped with DHT11 humidity sensor and GSM using arduino that provides a simple way to operate, smart processing on the data/values detected by the sensor and can easily access from the datalogger.


